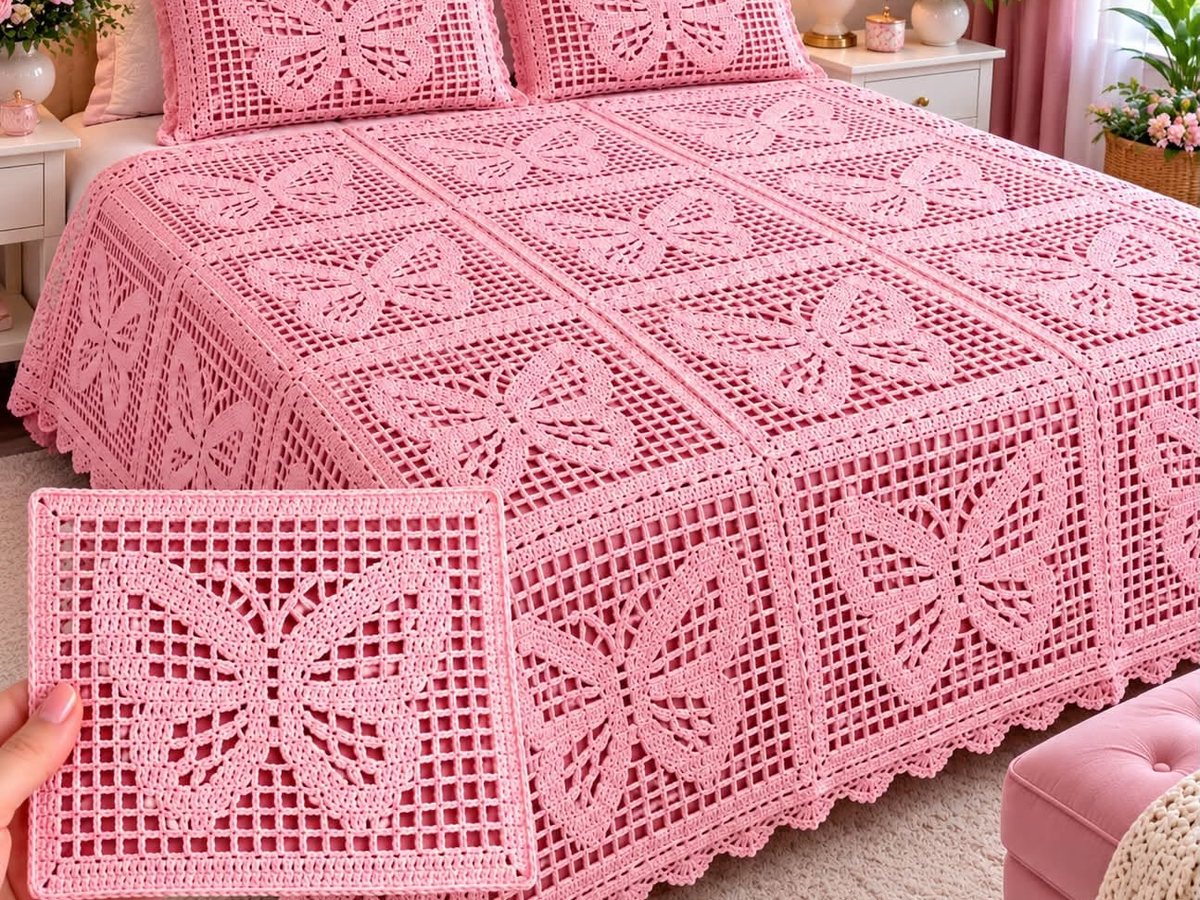
One butterfly. Twelve squares. A bedspread everyone will ask you about. This pink filet crochet bedspread turns a simple mesh into a big, soft butterfly on every square. From a distance it looks like lace. Up close, it is just chains and double crochets in a grid.
If you can chain and double crochet, you can read this pattern. We explain the mesh first, then the butterfly chart, then the easy joins. Scroll down to the chart section: it is the part most makers save and print.
What you need
- Yarn: fine to light worsted (DK) mercerized cotton in rose pink. About 1,800 g for a full cover with 2 pillow covers.
- Hook: 3.5 mm (E-4). Filet looks best with a firm, even tension, so go down a size if your holes look floppy.
- Tools: tapestry needle, scissors, stitch markers, pins and blocking mats.
- Pattern note: make one square first and weigh it. Multiply by 12, then add 15% for joining, border and pillows.
Abbreviations and size
- ch chain
- sl st slip stitch
- sc single crochet
- dc double crochet
- tr treble crochet
- sp space
- st(s) stitch(es)
- picot ch 3, sl st into the 1st ch
Square size: about 60 cm (24 in) after blocking, 45 x 45 mesh spaces.
Squares needed: 12 (3 across, 4 down) for a full cover of 180 x 240 cm drop included. Make 6 for a lap throw.
How filet mesh works
Filet crochet is a grid. There are only two kinds of boxes: open boxes (holes) and filled boxes (solid). The butterfly is made from filled boxes.
- Open box (OB): ch 2, skip 2 sts, dc in the next dc. (3 sts wide)
- Filled box (FB): dc in each of the next 3 sts, so the box is solid. (3 sts wide)
- Block over open box: 2 dc in the ch-2 space, dc in the next dc.
- Edge stitch: every row starts with ch 5 (counts as dc + ch 2) and ends with dc in the 3rd ch of the turning chain.
Rule to remember: every box is 3 stitches wide and every row adds 1 box height. A row of 45 boxes has 136 stitches. Count the first few rows and your grid will stay straight.
The butterfly chart, row by row
Start with a foundation chain of 138. Work Row 1 as dc in the 8th ch from the hook, then 44 open boxes across. Row 1 counts as the first row of boxes. Repeat for the border rows below.
- Rows 1–3 (frame): Work 3 rows of 4 solid boxes (a solid frame), then open boxes to the last 4. Finish with 4 solid boxes. The frame keeps the square flat.
- Rows 4–12 (open mesh): Work 4 FB, then 37 OB, then 4 FB. This is the quiet part before the wings begin.
- Rows 13–20 (upper wings): Start the butterfly with 4 FB, 12 OB, then build 2 wing tops with 6 FB each, 5 OB in the middle (the body gap), 6 FB, 12 OB, 4 FB. Add 1 FB to each wing every 2 rows.
- Rows 21–30 (widest part): The wings are at full size: 14 FB per wing with 1 OB hole between every 4 FB to make the wing veins. The body is 2 FB wide in the center.
- Rows 31–40 (lower wings): Reduce 1 FB per wing every 2 rows. Keep the vein holes in the same columns so the butterfly lines up.
- Rows 41–45 (tail and frame): Close the wings with 6 FB, then open mesh across. Work 4 FB at each end to match the top frame.
Fasten off after the last row. The finished square has a solid frame, an open mesh and a clear pink butterfly in the middle.
Next up: blocking. It is the 10-minute step that makes a butterfly look crisp instead of lumpy.
Block and lay out the squares
Pin each square to a blocking mat to 60 cm, steam lightly and let it dry. Filet mesh stretches a lot, so blocked squares match each other perfectly. Lay the 12 squares in 4 rows of 3. Turn the butterflies all the same way, or alternate them for a playful look. Take a photo of your layout.
Join the squares
- Place two squares with wrong sides together. Join with single crochet through both loops, one sc for every dc and one sc in every ch-2 space.
- Make 4 strips of 3 squares first, then join the strips. Join all seams the same way, so the ridges look like a design line.
- At the corners where four squares meet, make one stitch through all four so there is no gap.
- Keep your joining firm but not tight. The seam should be as flexible as the mesh.
Scalloped border
- Round 1: Join pink at a corner. Ch 1, sc evenly around, working 3 sc in each corner. Join.
- Round 2: Ch 3, dc in each st, working 3 dc in each corner. Join.
- Round 3 (scallops): *Skip 2 sts, 5 dc in the next st, skip 2 sts, sc in the next st. Repeat from * around. Join, fasten off and weave in all ends.
Matching pillow covers (make 2)
- Make 1 square, but stop at 30 boxes wide and 45 boxes high for a rectangle pillow.
- Work the butterfly chart in the center, using rows 13 to 40 of the chart.
- Make a plain mesh back with an overlap of 10 cm. Join the front and back with sc and add the scallop round.
Tips for success
- Count boxes, not stitches. If a row is 135 stitches, you have 45 boxes. Check this at the end of each row.
- Use mercerized cotton. It gives clear holes and a shiny butterfly.
- Put a marker every 10 boxes so you do not lose your place in the chart.
- Make a square a week. 12 squares is 3 months of calm weekends, or faster if you crochet every day.
- Weave ends as you go. Filet shows every loose end.
Common mistakes to avoid
- Skipping the blocking step. The butterfly will look small and bent.
- Changing the hook size mid-square, which makes the mesh look uneven.
- Making filled boxes too tight. They should be flat, not puffed.
- Forgetting the 3 stitches per box rule, so the wings shift by one column.
- Using a fuzzy yarn. It hides the holes, and the butterfly disappears.
Ways to change this pattern
- Baby blanket: make 4 squares in soft white or baby pink.
- Table runner: join 3 squares in a row.
- Single butterfly pillow: use one square with a fabric back.
- Two-color version: work the butterfly in a darker rose over a pale pink background.
- Bigger butterfly: use a 60-box grid for a 80 cm square.
Frequently asked questions
What skill level do I need?
If you can chain and double crochet, you can make filet. The pattern is a grid, so it is repetitive and calm. We rate it Intermediate because of the chart reading.
How long does it take?
One square takes about 12 to 15 hours. Plan 8 to 10 weeks for a full bedspread with border and pillows.
What is the best yarn?
Mercerized cotton in a DK weight. It has a clear stitch, good drape and is easy to wash.
Can I make it bigger or smaller?
Yes. Use 6 squares for a lap throw, 12 for a full cover and 15 for a king. Measure your bed first.
How do I wash it?
Machine wash on a gentle cycle in cold water, or hand wash. Dry it flat. Do not hang it, because the weight will stretch the open stitches.
Can I sell things I make from this pattern?
Yes, you can sell finished items. Please credit this website as the designer and do not copy or share the written pattern.