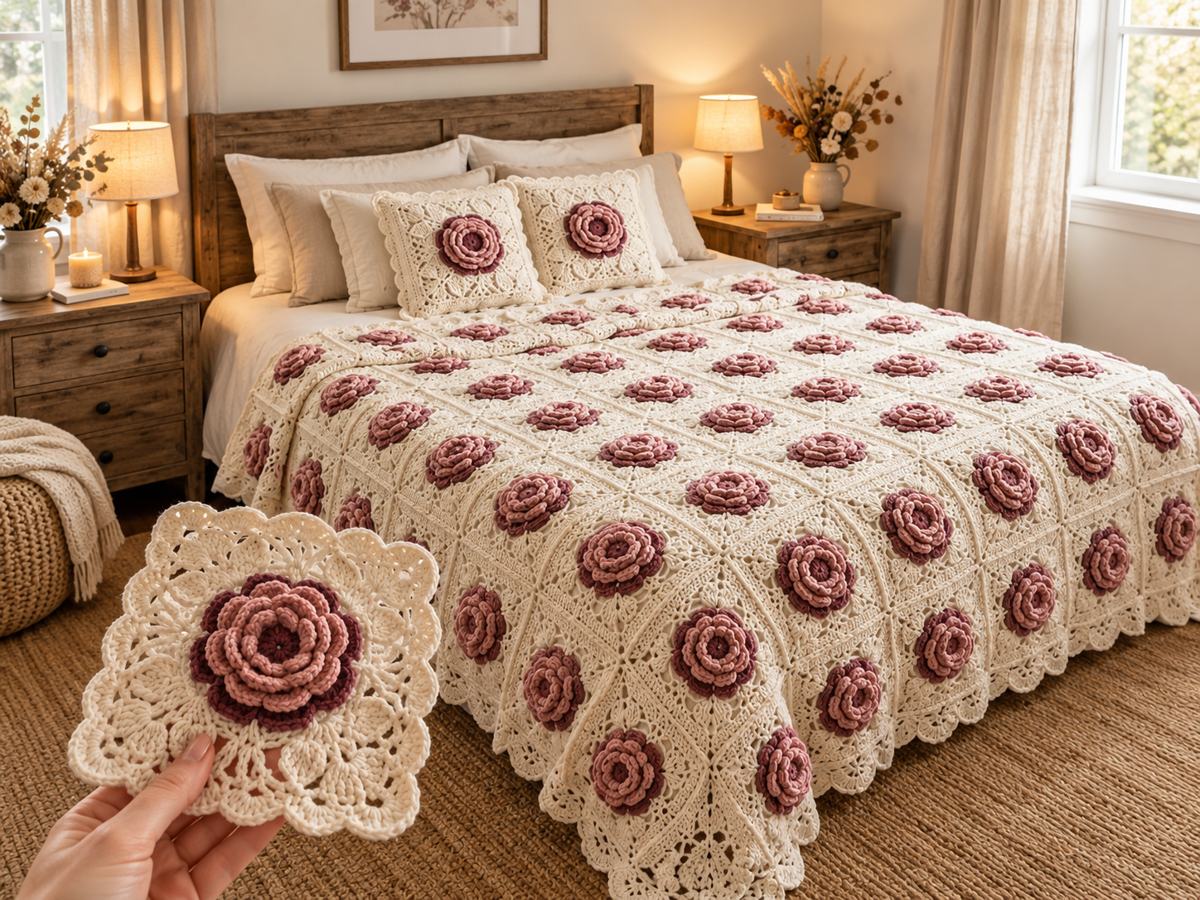
A cream bedspread with a soft pink rose in every square is a classic for a reason. It looks romantic, it feels like a family heirloom, and it works with wood furniture, warm lamps and linen curtains.
Each square has two parts: a 3D rose and a lacy cream square around it. You make them separately, sew them together, then join all the squares. The steps are small, so you can learn the rose first and repeat it.
What you need
- Cream yarn: fine worsted or DK cotton blend for the squares, border and joining.
- Rose colors: dusty pink and deep mauve (or burgundy) in the same weight.
- Hook: 4 mm (G-6) for the squares and 3.5 mm for the roses. A tighter rose holds its shape.
- Tools: tapestry needle, scissors, stitch markers, pins and blocking mats.
- How much yarn? Make one square with its rose, weigh it, multiply by 63 and add 15%. Buy all your cream at the same time.
Abbreviations and size
- ch chain
- sl st slip stitch
- sc single crochet
- dc double crochet
- sp space
- st(s) stitch(es)
- picot ch 3, sl st into the 1st ch
- magic ring adjustable starting loop
Square size: about 22 cm (8.5 in) after blocking.
Layout: 7 squares wide by 9 long = 63 squares, about 154 x 198 cm before the border, and about 170 x 210 cm after it.
Part 1: The 3D rose (make 63)
The rose is built from layers of petals. Work with your tight 3.5 mm hook. Do not worry if the first one looks uneven. By the third rose, your hands will remember it.
- Round 1 (mauve): Make a magic ring. Ch 1, 12 sc in the ring. Join and pull the ring tight. [12 sc]
- Round 2 (mauve): *Ch 3, skip 1 sc, sl st in the next sc. Repeat from * 5 more times. [6 loops]
- Round 3 (inner petals, pink): Join pink in any loop. In each loop work (sl st, ch 2, 4 dc, ch 2, sl st). [6 petals]
- Round 4 (back loops): Fold the petals forward. Working behind them, *ch 5, sl st in the round 2 stitch between two petals. Repeat from * around. [6 loops]
- Round 5 (outer petals, pink): In each loop work (sl st, ch 3, 6 dc, ch 3, sl st). Fasten off and leave a 30 cm tail for sewing.
Tip: use mauve for Rounds 1–2 and Round 5 edges if you want the deeper edge color seen in the photo, and pink for the other petals.
Part 2: The lacy cream square (make 63)
- Round 1: Ch 6, join with a sl st to make a ring. Ch 3, 2 dc in the ring, ch 2. *3 dc in the ring, ch 2. Repeat from * 2 more times. Join. [4 corners] Keep this ring large, about 3 cm.
- Round 2: Sl st to the next corner space. Ch 3, (2 dc, ch 2, 3 dc) in the corner space, ch 1. *(3 dc, ch 2, 3 dc) in the next corner space, ch 1. Repeat around. Join.
- Round 3: Sl st to the corner space. Make a corner. *Ch 1, 3 dc in the ch-1 space of the last round, ch 1, make a corner in the next corner space. Repeat around. Join.
- Rounds 4–5: Repeat Round 3. Add one more 3-dc group on every side in each round. The square now has 3 groups on each side.
- Round 6 (scallops): Ch 1, sc in the corner space. *Skip 2 sts, (3 dc, picot, 3 dc) in the next st, skip 2 sts, sc in the next st. Repeat to the next corner, placing (4 dc, picot, 4 dc) in each corner space. Join and fasten off.
Block each square to about 22 cm. Sew the rose in the center with its tail. Use a few small stitches around the outer petals so the rose lies flat and does not move.
Join the squares
- Lay out 7 columns by 9 rows. Mix the order of any squares that are slightly different in size.
- With cream yarn, whipstitch the squares with right sides together through the back loops only.
- Join the squares into 9 long strips of 7, then join the strips together. Match every scallop point.
- Where four corners meet, go through all four corners with one stitch.
- Weave in all the ends on the back side. Check the seams are flat.
Border
- Round 1: Join cream at any corner. Ch 1, sc evenly around the whole outer edge, placing 3 sc in each corner. Join.
- Round 2: Ch 3, *skip 1 st, dc in the next st, ch 1. Repeat around, making (2 dc, ch 2, 2 dc) in each corner space. Join.
- Round 3: *Skip 2 sts, (3 dc, picot, 3 dc) in the next st, skip 2 sts, sc in the next st. Repeat around. Join, fasten off and weave in all ends.
Matching pillow covers (make 2)
- Make 4 squares with roses and join them in a 2 x 2 block, about 44 x 44 cm.
- Work 1 round of sc, then the scallop round around the outer edge.
- For the back, ch 90, dc across and work 38 rows, then fasten off. Place the pieces wrong sides together, sc around 3 sides, add a cushion, then sc the 4th side closed.
Tips for success
- Make all the roses first. It makes the squares feel fast.
- Keep the tension even. Lace only looks good when the stitches are the same size.
- Steam the roses lightly. Hold the iron above the rose and do not press on it.
- Use cotton blend for good stitch shape. It also resists pilling on the bed.
- Keep a stitch count card for the square so you can check each round.
Common mistakes to avoid
- Making the Round 1 ring too small. The rose will not sit flat.
- Skipping the blocking step.
- Sewing the roses on loosely. They flop and look untidy.
- Using different cream dye lots. The squares will look patchy.
- Joining too tightly and creating a stiff seam.
Ways to change this pattern
- Soft sage and cream: use green roses for a fresh look.
- Bold romance: use red roses on a white square.
- Throw size: make 35 squares (5 x 7), about 110 x 154 cm.
- Cushion only: make a single square and rose and sew it on a ready-made pillow cover.
- Table centerpiece: make 1 large square of 9 rounds with a bigger rose.
Frequently asked questions
What skill level do I need?
You should know the double crochet and slip stitch. The rose is a small challenge, but it is easy once you repeat it.
How long does it take?
One rose and square takes about 1.5 to 2 hours. The full set takes 8 to 10 weeks if you make a few squares each day.
What is the best yarn?
A smooth cotton blend gives lace a sharp look. Avoid fuzzy or very soft yarns because they hide the lace.
How do I wash it?
Hand wash in cool water with mild soap or use a gentle machine cycle. Press water out with a towel. Dry it flat on a clean towel.
Can I make the pattern for a twin or king bed?
Yes. Use 5 x 8 (40 squares) for twin, 7 x 9 (63 squares) for queen and 8 x 10 (80 squares) for king. Measure your mattress first.
Can I sell finished items?
Yes, you can sell finished items from this pattern. Please credit this website and do not copy or share the written pattern.